
In this multi part blog post we will be creating a .NET Core based Web API with authentication and a number of other features.
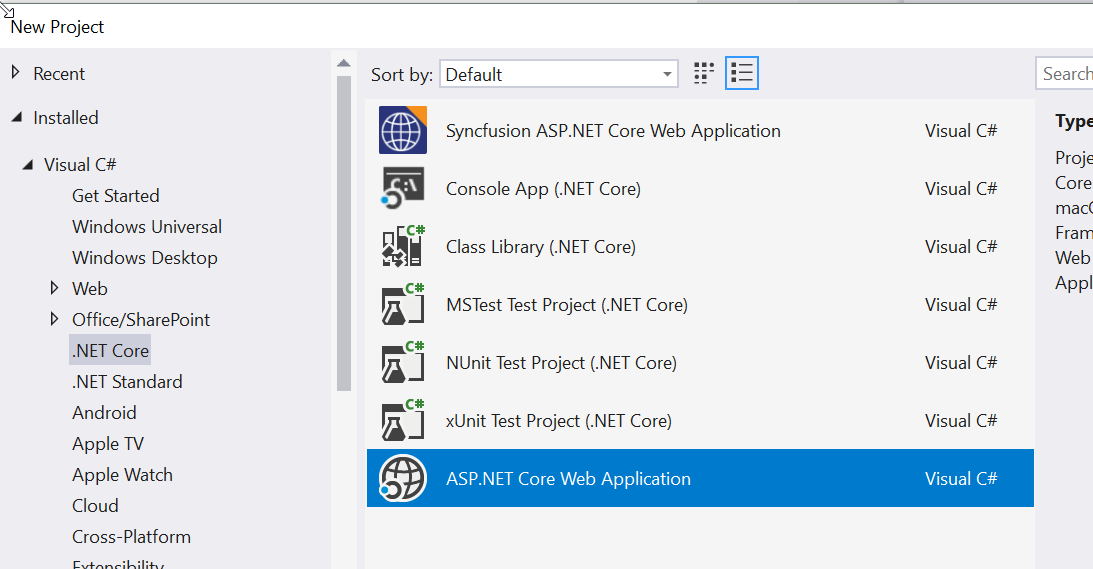
To start we will create a new project in Visual Studio by selecting the ASP.NET Core Web Application project type
then we select the API option on the next dialog
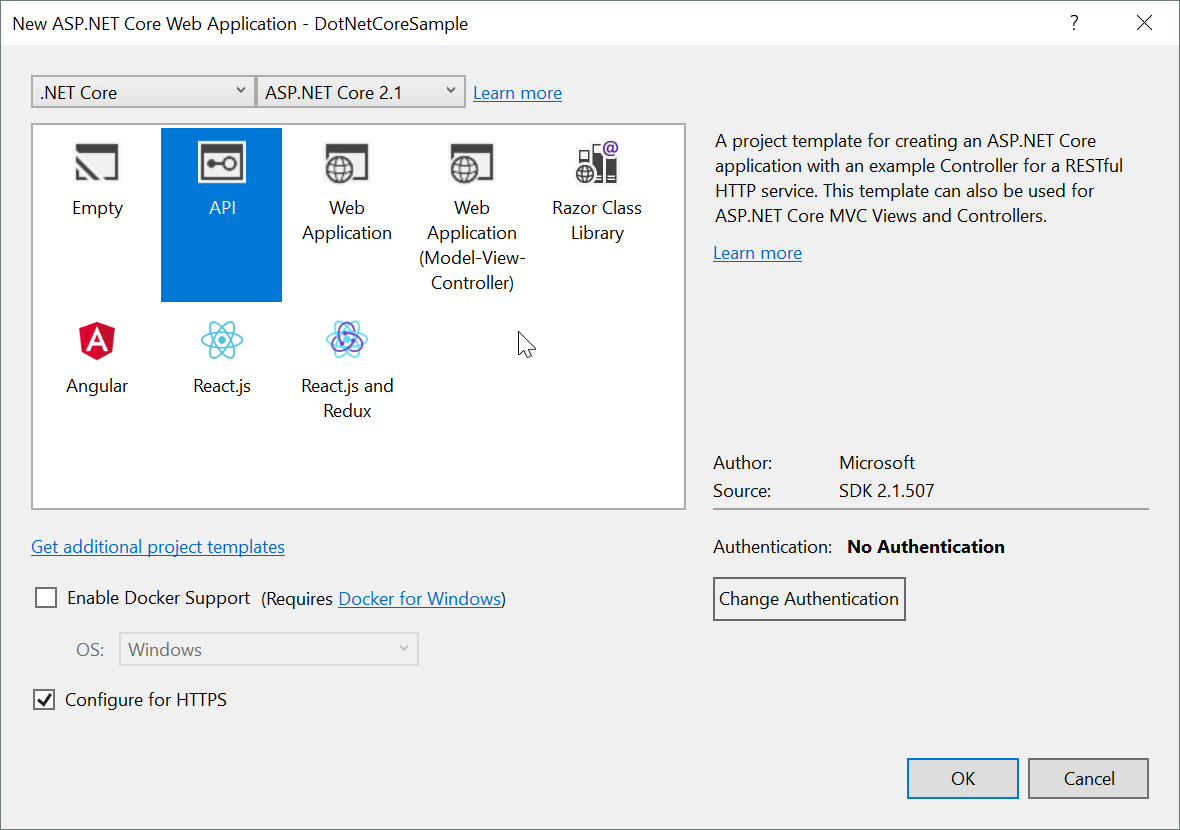
In this example we want to first implement authentication with a standard user and role table in our own database.
That is not an option in the template so we simply select ‘No Authentication’ and add it later on.
Click the OK button and wait for Visual Studio to create our base project. This will create a simple base web API with a sample values controller.
First thing we need to do is to configure the database connection. Add your connection string to the appsettings.json file
"ConnectionStrings": { "DefaultConnection": "Server=SERVER\\INSTANCE;Database=DOTNETCORESAMPLE;Trusted_Connection=True;MultipleActiveResultSets=true" },
We also need to create a database context and register the context with the application
//
public class ApplicationDbContext : IdentityDbContext<IdentityUser>
{
    public ApplicationDbContext(DbContextOptions<ApplicationDbContext> options)
        : base(options)
    {
    }

}
then in Startup.cs add the following to add the ApplicationDbContext
//
services.AddDbContext<ApplicationDbContext>(options =>
                options.UseSqlServer(
                    Configuration.GetConnectionString("DefaultConnection")));
To create the base ASP.Net authentication tables in our database execute the following line in the console
Add-Migration InitialCreate
this will create the migration steps for the initial creation of the authentication tables
now execute the following to run the migration
update-database
this will create all the tables in your database needed for authentication
In order to be able to extend the user table with additional fields we will create a model for our ApplicationUser
//
public class ApplicationUser : IdentityUser
{
    // Extended Properties

}
And of course we have to change all the references we have to IdenityUser to refer to the ApplicationUser instead.
Now we need to configure the project for identity and authentication
add the following code to the ConfigureServices method in StartUp to add the IdentoryService
services.AddIdentity<ApplicationUser, IdentityRole>()
    .AddEntityFrameworkStores<ApplicationDbContext>()
    .AddDefaultTokenProviders();
then also in ConfigureServices we add the following to configure the IdentityOptions
services.Configure<IdentityOptions>(options =>
{
    // Password settings.
    options.Password.RequireDigit = true;
    options.Password.RequireLowercase = true;
    options.Password.RequireNonAlphanumeric = true;
    options.Password.RequireUppercase = true;
    options.Password.RequiredLength = 6;
    options.Password.RequiredUniqueChars = 1;

    // Lockout settings.
    options.Lockout.DefaultLockoutTimeSpan = TimeSpan.FromMinutes(5);
    options.Lockout.MaxFailedAccessAttempts = 5;
    options.Lockout.AllowedForNewUsers = true;

    // User settings.
    options.User.AllowedUserNameCharacters =
    "abcdefghijklmnopqrstuvwxyzABCDEFGHIJKLMNOPQRSTUVWXYZ0123456789-._@+";
    options.User.RequireUniqueEmail = true;


});
and one more to configure the ApplicationCookie options
services.ConfigureApplicationCookie(options =>
{
    // Cookie settings
    options.Cookie.HttpOnly = true;
    options.ExpireTimeSpan = TimeSpan.FromMinutes(5);

    options.LoginPath = "/Identity/Account/Login";
    options.AccessDeniedPath = "/Identity/Account/AccessDenied";
    options.SlidingExpiration = true;

    options.Events.OnRedirectToLogin = context =>
    {
        if (context.Request.Path.StartsWithSegments("/api") &&
            context.Response.StatusCode == (int)HttpStatusCode.OK)
        {
            context.Response.StatusCode = (int)HttpStatusCode.Unauthorized;
        }
        else
        {
            context.Response.Redirect(context.RedirectUri);
        }
        return Task.FromResult(0);

        //context.Response.StatusCode = 401;
        //return Task.CompletedTask;
    };
});
Next step is to make sure we have some default roles and a default user in our database. To do this we can add code to seed the database with our defaults
Then we add the following line to the Configure method
app.UseAuthentication();
Lets create a class called SeedDataManager as follows
//
public static class SeedDataManager
    {
        public static void SeedData
            (UserManager<ApplicationUser> userManager,
            RoleManager<IdentityRole> roleManager)
        {
            SeedRoles(roleManager);
            SeedUsers(userManager);
        }

        public static void SeedUsers
            (UserManager<ApplicationUser> userManager)
        {
        }

        public static void SeedRoles
            (RoleManager<IdentityRole> roleManager)
        {
        }
    }
We can call the SeedData method from the configure method in Startup
public void Configure(IApplicationBuilder app, IHostingEnvironment env,
            UserManager<ApplicationUser> userManager,
            RoleManager<IdentityRole> roleManager)
{
    ....

    SeedDataHelper.SeedData(userManager, roleManager);


}
We use Dependency Injection to injext the UserManager as well as the RoleManager, then call our SeedData method.
Now lets take a look at seeding the role table. For our example lets create a role called ‘User’ and another role called ‘Administrator’
public static void SeedRoles
    (RoleManager<IdentityRole> roleManager)
{
    if (!roleManager.RoleExistsAsync
        ("User").Result)
    {
        IdentityRole role = new IdentityRole();
        role.Name = "User";

        IdentityResult roleResult = roleManager.
        CreateAsync(role).Result;
    }


    if (!roleManager.RoleExistsAsync
        ("Administrator").Result)
    {
        IdentityRole role = new IdentityRole();
        role.Name = "Administrator";

        IdentityResult roleResult = roleManager.
        CreateAsync(role).Result;
    }
}
and then we also create an admin user
public static void SeedUsers
    (UserManager<ApplicationUser> userManager)
{
    if (userManager.FindByNameAsync("admin@localhost").Result == null)
    {
        ApplicationUser user = new ApplicationUser();
        user.UserName = "admin@localhost";
        user.Email = "admin@localhost";

        IdentityResult result = userManager.CreateAsync
        (user, "Admin!1234").Result;

        if (result.Succeeded)
        {
            userManager.AddToRoleAsync(user,
                                "Administrator").Wait();
        }
    }

}
next time you run the project the system will create the two roles as well as our default admin user
to test the authentication we can add another endpoint to the values controller as follows
//
[HttpGet]
[Route("GetAuthorized")]
[Authorize]
public ActionResult<IEnumerable<string>> GetAuthorized()
{
    return new string[] { "value1", "value2" };
}
calling the following endpoint
https://localhost:44307/api/values
should return the following data
["value1","value2"]
calling the new end point decorated with Authorize will return an HTTP status code of 401 because we are not authenticated
https://localhost:44307/api/values/GetAuthorized
In Part 2 we will add an endpoint to authenticate a user with our web api
