DataFlex is not based on the .NET Framework. That means we cannot directly interface with .NET components. Luckily Microsoft added a technology called COM Interop which allows both a COM based system to call the .NET component and the .NET component to consume COM components.
In our case we want to be able to use a COM Interface which is supported by DataFlex to consume a .NET component.
But WHY?
Why would we want to do this in the first place?
A lot of things are often easier to do in .NET or a library already exists that can be used but very often now these libraries are not available any longer as ActiveX controls.
So in order to show how to consume a .NET component we need to first create a .NET component. We will use Microsoft Visual Studio to create one
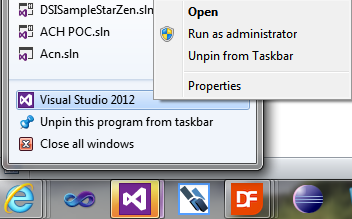
First we need to launch Visual Studio. Because we want Visual Studio to be able to make changes to the computers registry it would be a good idea to start it as Administrator
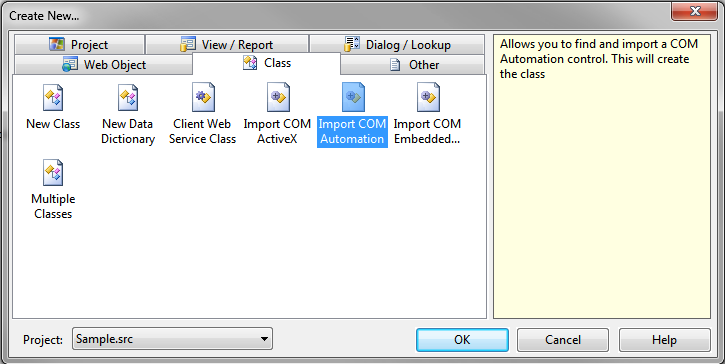
Once Visual Studio is started we need to create a new project
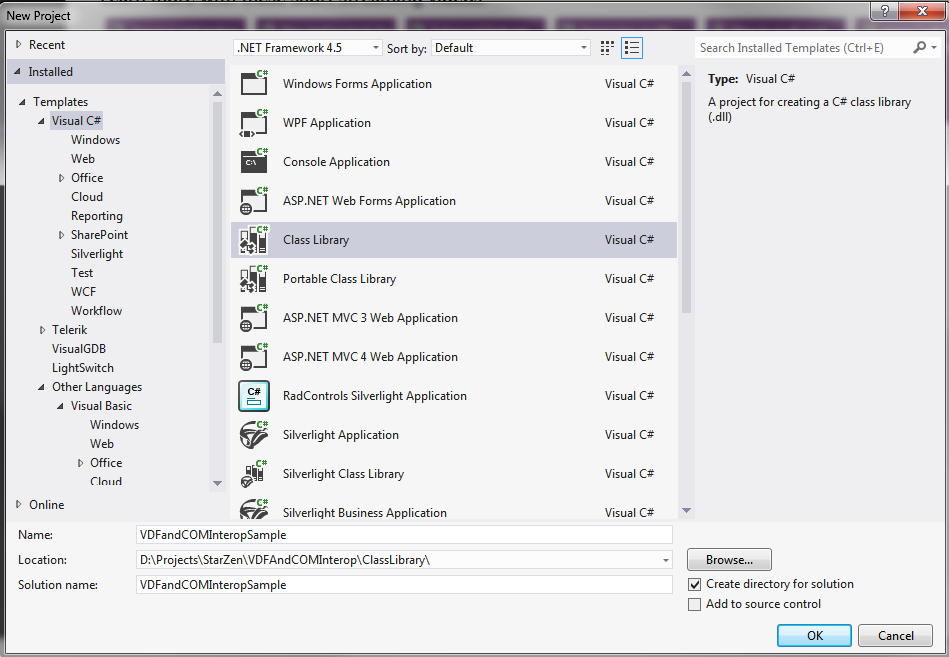
My preferred language is C# but you can do the same in Visual Basic of course. Select a Class Library project and type in a name and location
Visual Studio will create a project with an empty class called Class1 for you
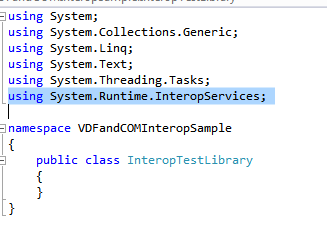
First you want to rename your class and probably also the code file (Class1.cs) or simply delete the class1 file and add a new one with a proper name
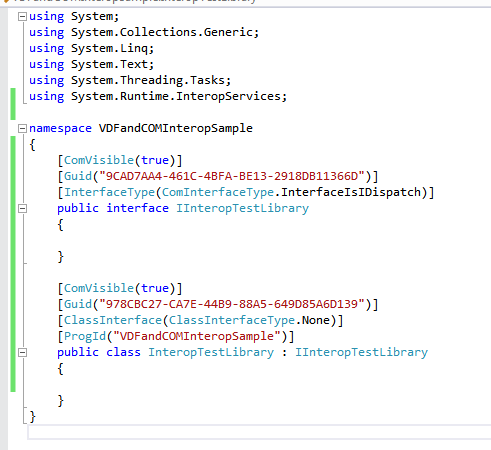
Also at the top above the class you will need to add a using statement for the System.Runtime.InteropServices which will be needed to enable COM Interop
In order to create and use this component we need two main parts.
A class implementing the functionality of our component and a so-called Interface that is a contract describing all the methods and properties that will be available in an object created from this class
We already have an empty class now lets add an empty Interface definition
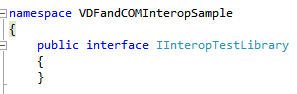
as you can see right above the class definition (inside the namespace declaration) we define a public interface
The next step is to tell Visual Studio about this interface. We can do this by using metadata. In that metadata we have to do the following
- tell Visual Studio that the following interface should be visible as a COM component
- define a GUID for the interface
- define the Interface type for our interface
Whats a GUID?
A GUID is a globally unique identifier. It a 128-bit value generated from random numbers and most often displayed as 32 hexadecimals digits. COM uses GUIDs as unique identifiers for components
Where do we get these GUIDs. The beauty of GUIDs is that we can programatically generate them at any time. Visual Studio has a little utility built in to handle this task for us.
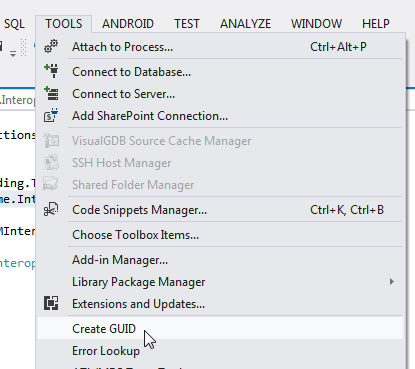
From the tools Menu select Create GUID

The Create GUID dialog will be shown. In this case we will need format #5. Select Format #5 and then click New GUID and then click copy to copy the new GUID to the clipboard
Now lets add the metadata
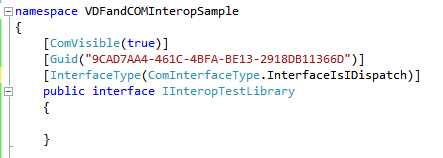
We add a line that tells Visual Studio to make this interface visible as a COM component
then the next line we add the GUID generated earlier. This is our interfaces unique identifier and will be used to register the interface.
The InterfaceType is defined as an IDispatch interface.
Now lets work on the implementation of our class
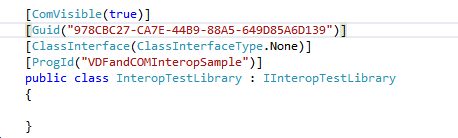
Our class needs to inherit from the interface. In addition we also need to add metadata to the class.
The class also needs to be set to ComVisible and we need another GUID for our class.
In addition we define the class interface type and assign a ProgId to our class
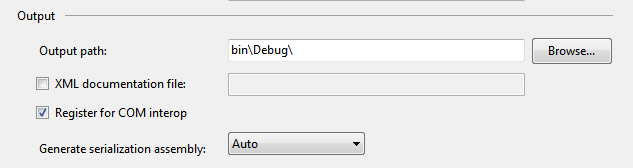
To make it easier on us we can tell Visual Studio to automatically register our component for COM Interop when the project is built
You can simply open the project build properties and enable to Register for COM Interop option
You do not have to do the above step. You can also manually register the component using the REGASM utility. In order to register your component using REGASM simply start a Visual Studio command prompt as Adminstrator and execute the following
REGASM dllfilename.dll /tlb /codebase
The codebase switch is not required nor should it be used when deploying but it makes life easier on the development machine
At this point our full source should look as follows
Now we build the project in Visual Studio which will build our component and register it for COM Interop
Now in our DataFlex project we can import the component
On the import Automation library dialog browse to the folder containing your dll and tlb file and select the tlb file created by Visual Studio
Once selected the Studio will generate a DataFlex class package based on the interface published in our Visual Studio project
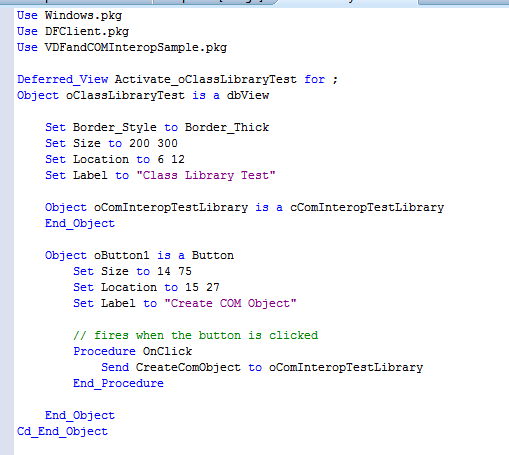
Create a new view to test the component
At the top of the view use our class and add a Button to the view
We can add our COM object to the view and then in the OnClick procedure of the button we can call the CreateComObject method to instantiate the COM object
Of course at this point our class is somewhat boring so we need to add actual functionality to our class. Back to Visual Studio
Our first major feature will be the Hello function. We want to function to accept a name as a parameter and then let it return a new string saying something like ‘Hello name, how are you?’
In order to do this we need to do 2 things
- Add the function declaration to our interface
- Add the function implementation to our class
First in the interface we add the declaration
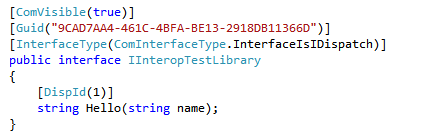
as you can see above we declare a function called Hello that returns a string and accepts a string as a parameter
above the function declaration you can see a metadata line. We are assinging a DispId of 1. The DispId is the numeric identifier for this method in the COM component.
This line is not required because Visual Studio can automate assignment of DispIds but we prefer controlling our own DispIds.
Next we need to implement the actual method

Here we can see a simple method accepting a string parameter called name. It simply returns a string that says ‘Hello name, how are you’.
Now we can rebuild our Visual Studio project
Then back in DataFlex because our interface has changed we will need to regenerate the class for our COM component
After regenerating the class add a form called oName and add another button to your test view
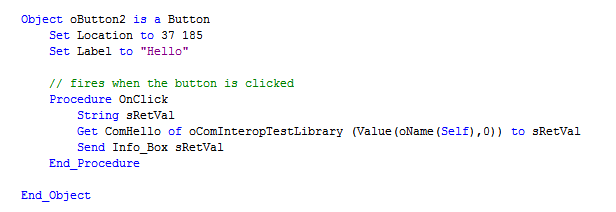
In the OnClick method we call the ComHello method in our com component passing it the value of our oName form. Then we use the Info_Box method to show the return value
Make sure to build your Visual Studio project as a 32bit project.
When deploying your components either use REGASM to register or you can use registration free COM
some libraries we have built using this technique include
- SQL Query library
similar to the built in SQL commands but faster and allows us the use of parameterized queries - ODBC Query library
same as the SQL Query library but for ODBC - MetaPhone library
- File IO
- PDF Library
- JSON Parser
and more
