What is Internet of Things?
Essentially they are devices that can be sensed or controlled via the internet. From house lights to kitchen gadgets, lawn care, security systems to pretty much any device we can think of.
Technically simply a device that is computer controlled and that computer inside the device is connected to a cloud interface that allows you to remotely monitor it and/or control it.
DataFlex?
No, we are not going to run DataFlex on an embedded device that wouldn’t make sense. What we are going to do is to build an IoT device and then use DataFlex to monitor and control the device
in this example I decided to create a small weather station device that allows me to monitor temperature, humidity, barometric pressure and other things such as wind speed, direction, rainfall, etc.
Particle Photon
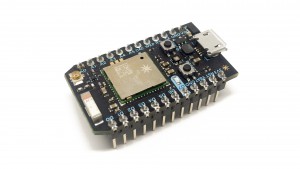
For the device i chose a Particle Photon board. The Particle Photon is a prototyping board for IoT devices and comes with a cloud system already created for you. It is essentially a combination of a ARM Cortex microcontroller, a Broadcom Wi-Fi chip some memory and a few other components.
The Photon can be programmed using Wiring, C/C++ or even ARM assembly.
The great thing about the Photon (or the Electron which has a 3G modem instead of Wi-Fi) is that it includes the cloud service and cloud library.
When you receive your photon you can use an app on your phone to help connect the device to your Wi-Fi and then register the device on the Particle Cloud.
Once registered you can remotely control the device and/or remotely query values from the device
We are not going into detail on building the device here. We may do that in another blog. But we want to look at how we can monitor and control the device from a DataFlex application either desktop or web application.
On the device we registered a cloud variable called winfo which is filled by the device with a JSON text containing the following
Temperature
Humidity
Barometric Temperature
Barometric Pressure
we could do other information as well but for our test this should be enough
here is some example code on what that could look like on the Photon
String winfo;

void setup()
{
  Particle.variable("winfo", &winfo, STRING);

    //Initialize the I2C sensors and ping them
    sensor.begin();//This will print out which devices it has detected

    sensor.setModeBarometer();//Set to Barometer Mode

    sensor.setOversampleRate(7); // Set Oversample rate

    sensor.enableEventFlags();
}

void loop()
{
      //Get readings from all sensors
      getWeather();

      winfo = String::format("{ temp: %f, humidity: %f, baroTemp: %f, pascals: %f }", tempf, humidity, baroTemp, pascals);
}
the Photon automatically connects to the particle cloud when powered on.
Communicating with the Photon
Each photon device has a unique identifier. In addition when registered a security token is issued for the device as well. We can use a RESTful web api to communicate with the photon from our DataFlex application or any other application for that matter of course
Similar to my blog post on calling RESTful services we build a simple view that can call a RESTful service using GET. This is essentially the same as typing the URL into the address bar of your favorite browser
start with a simple view and then add the following to the top
Use Windows.pkg
Use DFClient.pkg
Use cHttpTransfer.pkg

Deferred_View Activate_oDataFlexAndIoT for ;
Object oDataFlexAndIoT is a dbView
    // create an HTTP Transfer object

    Object oHTTPTransfer is a cHttpTransfer
        // the host points to the particle cloud
        Set psRemoteHost to "api.particle.io"

        // we need to use SSL
        Set piRemotePort to rpHttpSSL
        Set peTransferFlags to ifSecure

        Set pbShowErrorDialog to True

        // for now we simply show the data returned
        Procedure OnDataReceived String sContentType String sData
            Showln sContentType
            Showln "-----------------------------------------------"
            Showln sData
            Showln "-----------------------------------------------"

        End_Procedure
    End_Object
the remote host is pointing to the particle cloud API. We also have to use SSL to create a secure connection to the cloud API
then for testing we simply show the data returned by the API
The next thing is to call the cloud API
we add a button to the view as follows
    Object oGetWeatherBtn is a Button
        Set Location to 13 28
        Set Label to 'Weather'

        // fires when the button is clicked
        Procedure OnClick
            Integer iRetVal

            String sURL sDeviceID sAccessToken
            Move "###########" to sDeviceID
            Move "###################" to sAccessToken

            Move ("/v1/devices/"+sDeviceID+"/winfo?access_token="+sAccessToken) to sURL

            Get HttpGetRequest of oHTTPTransfer sUrl to iRetVal
        End_Procedure

    End_Object
the device id is the unique id for the device. The access token is a secure access token assigned by the API when the device is registered.
the URL to query variables is as follows
/v1/devices/#######/winfo?access_token=######
winfo is the name of the variable we are querying and of course the device id and access token have to be sent.
Now we compile and run the program
After clicking the button if the device is running and connected we will get the following data returned
{
  "cmd": "VarReturn",
  "name": "winfo",
  "result": "{ temp: 78.786606, humidity: 43.598694, baroTemp: 77.112503, pascals: 101761.750000 }",
  "coreInfo": {
    "last_app": "",
    "last_heard": "2016-03-14T16:29:58.548Z",
    "connected": true,
    "last_handshake_at": "2016-03-14T16:29:45.869Z",
    "deviceID": "#########",
    "product_id": 6
  }
}
the data is JSON data and the field we are interested in is called ‘result’
The data in the result field is JSON data
{
    temp: 78.786606,
    humidity: 43.598694,
    baroTemp: 77.112503,
    pascals: 101761.750000
}
and it reports all the values we prepared on the photon.
Now our DataFlex application can use these values and show them on screen or save them in a database, etc.
